How to Scrapbook: The Ultimate 'Learning How to Scrapbook for Beginners'
In this guide, I'll give you some ideas on how to scrapbook like a pro in a few easy steps.
Scrapbooking is super fun and rewarding, but there's a lot to take in :) It isn't just about sticking things down on paper.
In this guide I'll break things down for you, so you can get started.
Firstly when it comes to your scrapbook project, don't get overwhelmed. Stick to the basics (which we'll cover in this guide :))
Soon enough, you'll be able to easily and instantly enhance the look of your homemade scrapbook pages.
At the end of the day making scrapbooks is about preserving your beautiful memories (pictures). So as you begin your journey, try and keep it fun and remember, scrapbook making for a beginner is as much about experimentation as it is creativity!
Here are a few basics to start creating beautiful scrapbooks.
Table Of Contents:
1.How To Set Up Your Workspace
2.Selecting And Organizing Photos
3.Gather Scrapbook Supplies Without Burning Through Money!
4.How To Layout Your Scrapbook Pages
5.How and Why To Journal On Your Scrapbook Album
6. Final Thoughts
How To Scrapbook In 5 Simple Steps!
1. How to Set up your workspace
Before the scrapbook ideas flow, in fact before you even stick anything down to paper,
your scrapbook supplies and space need to be organized!
Resist the crafter's urge to rush out and buy albums or paper until you have the space ready.
Getting your physical space right will really help your mental and creative space and can be a fun project to focus on. I've been making personalized scrapbooks in so many random places over the years but I honestly feel like I produce my best work (and love scrapping even more) when I have a tidy and organized designated space.
Find an area in your house that can be dedicated to creating scrapbooks. This is where you'll be able to keep all your scrapbook supplies (such as your albums, scrapbook paper, pictures, etc)!
Is there a small closest that isn't being used that could have the door taken off and used as a work area?
What about the landing at the top of your stairs? Or how about the odd little nook off the kitchen? If it's only used as a temporary storage area, start to claim it as your scrapbook sanctuary!
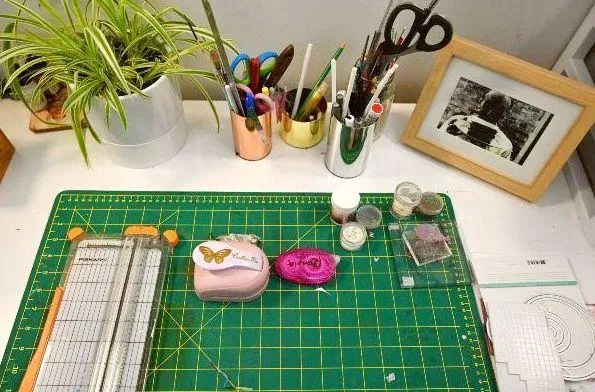
Make a scrapbook page in record time by organizing your craft space!
Any place that has nearby storage for your scrapbook supplies is also great and would be your first choice. You'd be surprised how quickly your paper stash and collection of albums can get! Also, a quiet space can be beneficial. I find my best scrapbook ideas for beginners come when it's lovely and quiet.
Ideally, you need a scrapbook space big enough to house a small desk or make a work table by placing a countertop over two 2-drawer file cabinets. But remember, the smaller the space you're using, the more organized you'll need to be, otherwise, things get messy.
I know this first hand. My current space is an internal room and I have serious scrapbook paper storage issues. I have at least two piles of paper under my desk, and then even more paper stored on my shelf. I'm still working on a solution!
A big tip is to surround your scrapbook crafting space with beautiful things that you love. Perhaps some photos of your family, maybe your favorite album on display or even some flowers. You could even showcase previous pages you're most proud of in frames on the wall. When you feel happy your creativity will blossom and the inspiration will come which will make it easier for you to create eye-catching scrapbook layouts!
Having good natural light is one thing I definitely recommend. But if you can't then there are some real desk lights on the market that can help you see that all-important detail.
I use LED lights as my scrap room is an internal room and they are really good. Focus on creating a positive space and great idea will flow!
2. Selecting and organizing photos (my top ideas!)
The central part of a scrapbook layout is your photos.
So organizing them is an important project you can do. If your photos aren't already sorted, take time to organize them before you begin. It will save you a lot of time.
One of the slowest parts of putting together a scrapbook photo album is deciding which photos to use. This is why getting your photo collection in order (deciding which pictures are scrappable) will save you time in the long run.
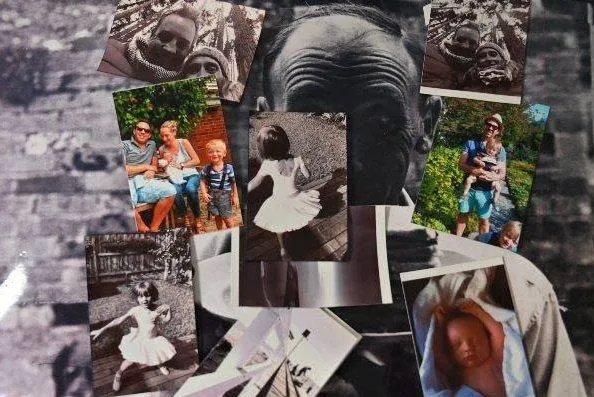
Cherish your memories by creating a scrapbook album using photos of your family members!
Here's one of the easiest and most helpful scrapbook organization ideas for beginners you'll hear and it's one I love – purchase clear plastic bins (about the size of a shoebox) and label the top and front of each bin.
Labels might include family members, relatives, vacation, wedding, holidays, etc. As you begin to sort through photos, quickly place them into the corresponding bin. This way they'll be at your fingertips when you're ready to start working on a page.
Since you're in the sorting mood, be sure to check desk drawers, closets, and any other place where old photos might be stashed.
Once you have gone through all the photos, you can then begin to organize each bin. Use
large index cards to separate and label the photos inside each bin.
Sidenote - I also like to store my paper using a similar approach. I use clear plastic bins (the big ones) and sort my paper by colors that go well together OR by theme (birthday, love etc).
I have a lot of my photos online so print as I go. I use my cheap printer (which I love!) with photo paper and its works really well. My photos come out clear and sharp. And once you have the printer, the paper is relatively inexpensive!
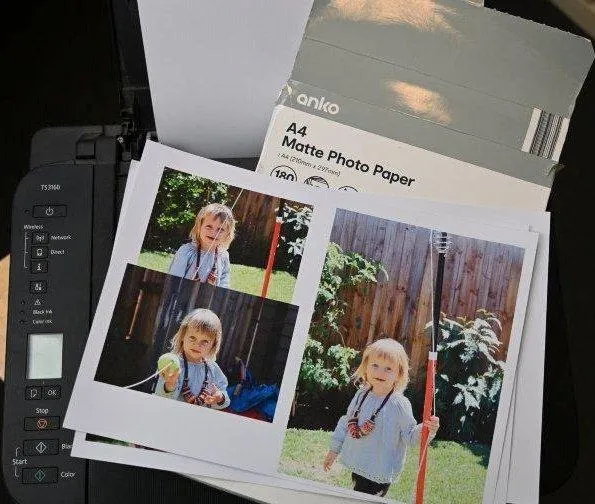
Preserve your old photos by scanning them and saving a copy on your computer
Gather the photos that you want to use for your scrapbook album. Keep in mind that you'll probably have more photos than you'll actually use, but you can narrow the choice when you get ready to work on your scrapbook pages.
Tip: I like to use the paper scraps from my home-printed photos - you can ink these scraps of cardstock and use them as borders, flourishes, or even use them as a 3D underline for your page title.
Here's one of my favorite scrapbook ideas for beginners. Scan or photograph your precious (one of a kind) photos so you can keep the original one super safe and use the scanned version (Print out on good quality printer paper or get your photos printed at your nearest printing service).
3. Gather scrapbook supplies without burning through money!
As tempting as it might be to purchase a lot of scrapbook supplies at once (cardstock haul anyone??), stick with the basics.
I remember walking into my first supplies store and wanting to buy the LOT. Be warned, that eyeball inspiration can be a real trap for beginners! It's tempting to buy everything and anything that appeals to you when shopping for scrapbook supplies. If you can, practice restraint :)
A worthwhile project is to create a list of exactly what you need and then stick with the list! I would also at this point consider a style you want to start with - did you want to try a vintage style, modern style, masculine, etc. Deciding will help focus the different options when it comes to what paper, albums to purchase, etc.
Your list of scrapbook supplies should include:
• page protectors
• patterned paper (acid-free)
• plain solid color or white cardstock
• photos you want to scrap (see above for tips on organizing your photos)
• a scrapbook album (or two!)
• die cuts
• die-cut machine
• plain paper (for your scrapbook page)
• stickers
• scrapbook embellishments
• Paper trimmer or scissors
• beginners supplies like markers, washi tape, glue, etc
• scrapbook magazines (flicking through one of these can give you loads of ideas for your pages that you'll love!)
• a scrapbook sketches book (we sell a few of these to help you!)
Make sure anything you want to adhere to your page is acid-free. Some items (such as old ticket stubs) can contain acid, which over time erodes your pages and can ruin your photos.
One of my favorite products is Krylon's 'make it acid-free'. This is a scrapbook spray that literally removes the acid from almost anything. It's a great way to protect your photos and scrapbook page by making them acid-free.
For example, some stickers contain acid, and using this miracle spray will remove the acid and make it ok to use it on your layouts.
Did you know you can use some household items for basic scrapbook items supplies? This is a great option for those who want to learn to scrapbook on a budget.
Check this blog out for 6 essential scrapbook tools in more detail.
As you continue learning how to scrapbook on a budget, you can gradually add to the basics. For now, this beginners article covers the basics to get you started.
4. How to layout your scrapbook pages
Now you're ready for the fun part of learning to scrapbook, creating your first scrapbook page! With pictures sorted, scrapbook tips in mind, and supplies on hand, you need to get focused on the layout of your scrapbook album and pages.
Now don't expect inspiration to flow right away. So be gentle with yourself. This is a process, and some parts of it may come easy, others not so easy :)
Tips for beginners: The first page of your album will be the title page. You might want to do this scrapbook page last so that the title that you choose truly reflects what the album contains. Although I do have some scrapbook albums that are miscellaneous in theme and that's ok too.
Begin with the next two side-by-side pages. You may want to have one scrapbook theme per spread. Rather than thinking of each page as a separate unit, think of what you want to capture on the double-page scrapbook spread.
When someone flicks through an album of mine, I want each turn of a page to be a new immersive experience!
Choose your photos and temporarily arrange them onto the scrapbook pages. Then select a patterned scrapbook paper that fits the theme. Hopefully, you'll like what you see!
Now start arranging the elements and photo (s) on the page till it looks eye-catching and beautiful. What you'll find, is as you're doing this, the inspiration will start to come from just seeing the photos on the paper, and the other elements on the page.
Quick Tip on how to get started
For beginners, I highly recommend using scrapbook sketches or template to give you a great idea for your pages.
Sketches are so helpful, they can help you understand where to put the photo, the title and I find they're super helpful if I need to finish an entire scrapbook album in record time.
You can also navigate to the product menu here on our site and see our scrapbook sketches
book if you need additional ideas for beginners!
Okay, now it's time to adhere the scrapbook patterned paper to the scrapbook page.
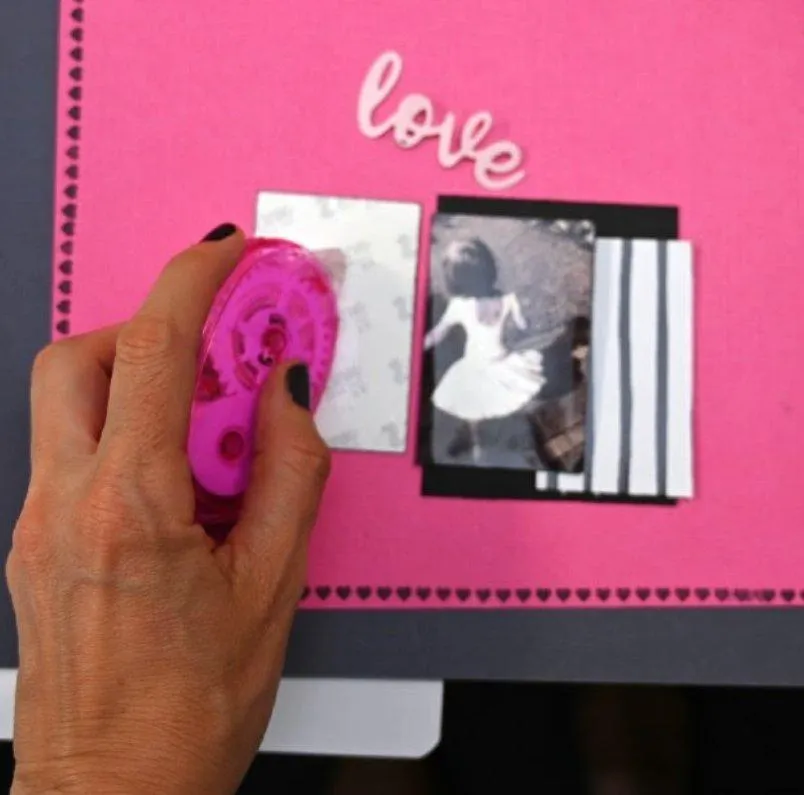
Use acid free adhesives when adhering your embellishments!
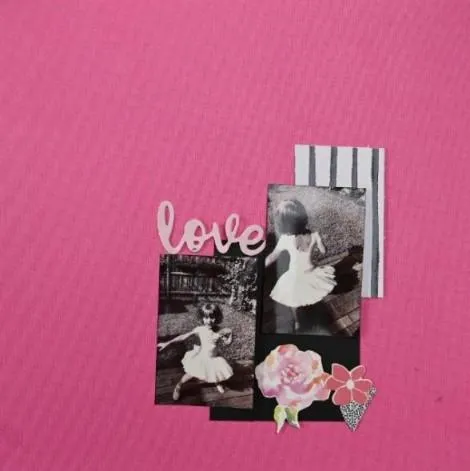
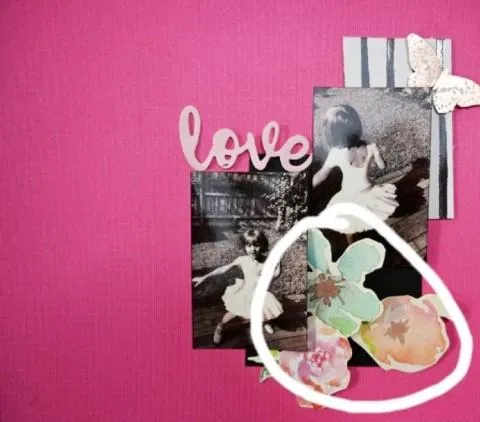
Use complementary colored scrapbook patterned paper to matte your photo on to create a frame.
You will want your photo to stand out on your scrapbook page.
Check this blog out for more information on matting your photos on your paper to make them stand out.
On your scrapbook page, you'll need to embellish the patterned paper with stickers, confetti, die-cuts, and other small items, but be careful to not overdo it. In fact, I love the philosophy of keeping it simple.
One of the biggest mistakes beginners make with their layout is complicating things. Here are many other mistakes new scrapbookers make while learning to scrapbook and how to avoid them.
I recommend placing your scrapbook embellishments or stickers around your photo or in a cluster on your scrapbook pages. If embellishments are too far away from the photo then it can draw the eye onto other things.
Learn how to create scrapbook pages the easy way by checking out our scrapbooking made simple article!
Here's a blog post with some ideas for beginners on how to give your scrapbook pages that extra eye-catching element.
To create more dimension on your page you can add pop-up dots, double sided tape, or foam dimension dots - if you place photos/pictures or embellishments on these you really can see your page come alive.
Read our beginner's guide to page embellishments for your scrapbook layout.
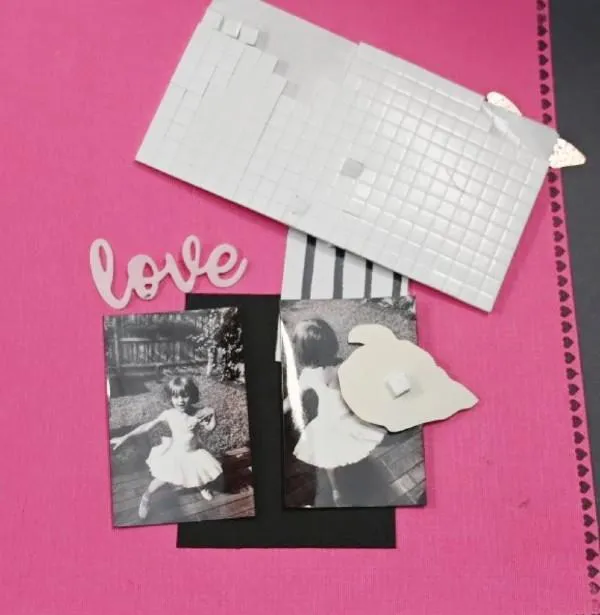
Make a scrapbook page with 3d embellishments by using double sided tapes!
Once you've finished your scrapbook layput, be sure to use page protectors to ensure your cardstock and page won't accidentally get ripped, torn, or stained.
If you want more of a challenge and want to create a keepsake or beautiful gift for a loved one check out this amazing ultimate mini scrapbook album tutorial.
5. How and Why to Journal on Your Scrapbook Album
One of the key components of scrapbook making is journaling.
Remember the old photo albums that contained little or no room to write information about the pictures?
As you flipped through someone's album you would constantly have to ask, "Who is this?" "Where was this taken?" "What's happening in this picture?"
One of the benefits of learning to scrapbook is that you have space to journal! Of all our scrapbook tips, we want you to remember to make journaling something you love and enjoy.
You can write down key phrases that describe each photo or make funny captions reflecting what's happening in a picture. As you journal, be sure to include names and dates. A few years from now you'll be glad that you did!
Here are some ideas and inspiration for adding scrapbook journaling to your page:
• Consider adding journaling to your layout as a scrapbook border (write directly onto the cardstock).
• Think about incorporating journaling into a tag.
• Hide your journaling on your layout inside its own envelope.
• Create a mini-book of journaling (credit card size) and add it to your page.
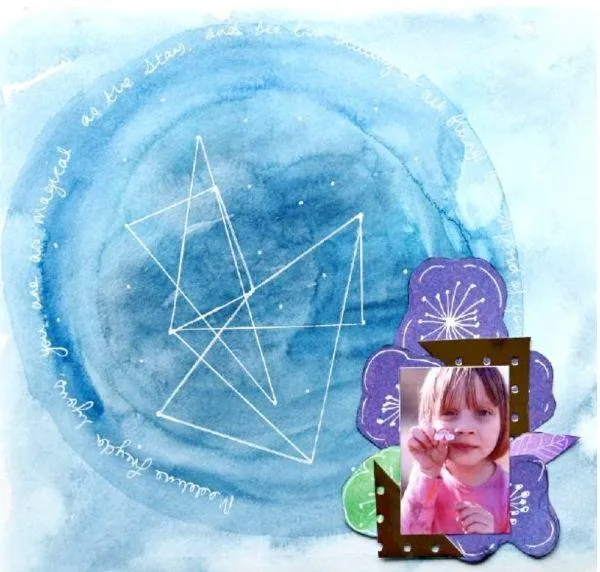
Make a scrapbook layout with journaling elements to add sentiments to your page.
After you have completed each of your eye-catching scrapbook layouts, it's time to create a catchy or inspiring title page. Include just one picture, the title, and the year. By keeping the title page simple, it makes it very clear what the viewer can anticipate seeing in the next few pages.
Place the pages inside of the page protectors once they are thoroughly dry. Then it's time to put your album together.
If you have used foam dimension dots or cardboard to raise elements off your page you might find it hard to fit it in your page protectors. I recommend trimming your page down just a little on every side and it will slide into your page protectors easily.
Albums make a fantastic gift too! Perhaps you have some friends getting married or celebrating an anniversary. There are lots of ways you can bless others with your love of making scrapbooks.
To further understand the basics of scrapbook making, you should check out our scrapbook 101
article and start scrapping like a pro in no time!
Keep our scrapbook ideas and tips in mind throughout your creative journey!
As you learn scrapbook making for beginners and get started on this wonderful adventure, you will discover that making scrapbooks is a super fun and relaxing hobby. It's something that you can enjoy time and again and your family and friends will enjoy the albums and pages you put together.
Your pictures will come to life and pop off a page that your family can pass down through the years.
Good luck creating your first scrapbook and enjoy this new time of discovery! Feel free to start looking around our site for a helpful and great idea, plus tips, and inspiration!
Your first album isn't far away! If you want to learn more about how to scrapbook then you should check out our scrapbooking made simple article.
OUR BEST SELLING BOOKS


HERE'S SOME OTHER SCRAPBOOKING ARTICLES THAT YOU MAY FIND HELPFUL
The Top 5 Scrapbooking Tools That Are Proven To Help You Create Better Layouts
12×12 Scrapbook Layouts Tips You Should Never Miss!
5 Tips To Creating Catchy Scrapbook Titles For Your Layouts
TOP 5 Scrapbooking Ideas I LOVE!
How to Scrapbook: The Ultimate 'Learning How to Scrapbook for Beginners'
Scrapbooking Tips: 10 Tips To Help You Create Even More Enchanting Pages!
5 Simple Scrapbook Organization Ideas and Tips!
Scrapbook Stores Online: Shop from the Top 7 Best Craft Stores
Contact Us | Login | Store | About | Reviews | Privacy Policy | Terms & Conditions | Returns
Copyright © 2025 by ScrapbookingCoach.com
We accept payment with:
