
Insider Secrets To Scrapbook Embossing Like The Pros!
Have you ever admired scrapbook embossing that someone has done and wish that you could create something so stunning? You can! In fact, embossing is rather simple to do and it's fun. It adds dimension and texture to a page.
There are two types of paper embossing—dry embossing and heat embossing. Check out these incredible scrapbook tips to emboss like a pro!
Scrapbook Embossing with vellum. Delicate and pretty.
Vellum paper is beautiful and can be used in a variety of ways, including scrapbook embossing.
Cut the paper into a desired shape, such as a flower or a heart. If you have an electronic die-cutting tool, you can use the embossing tip to make accents in your design. The embossing tip will cause the vellum to become more opaque. Adhere the vellum design by using a clear drying glue on the back center of the design. Press the design firmly to your layout. To disguise the glue, add a tiny flower, button or heart to the center of your design. Experiment placing your vellum designs in different areas of your layout.
Want to learn more awesome scrapbooking tricks? Click here and check out our books!
Embossing with rubber stamps. Make designs pop.
To add a special touch to your layout, scrapbook embossing can easily be done with rubber stamps. You'll need:
♥ cardstock
♥ scissors
♥ two-sided tape
♥ rubber stamps
♥ embossing ink pad
♥ embossing powder (i.e. glitter, pearl, metallic)
♥ small heat gun/blow dryer
♥ small paint brush
♥ piece of scrap paper that has been folded to form a crease, but then opened to its full size
Follow these simple steps to create beautiful rubber stamp scrapbook embossing:
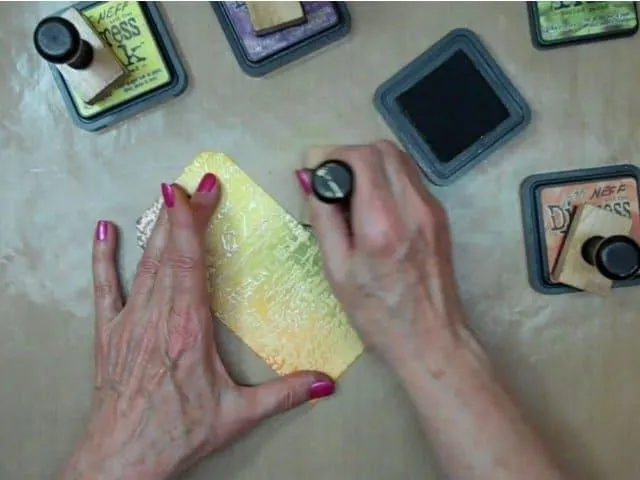
Step 1. Cut a piece of cardstock to desired rectangular size. It should be at least a quarter inch bigger than the rubber stamp image, but can be bigger.
Step 2. Press your rubber stamp into the embossing ink pad, making sure it is evenly coated. Press the rubber stamp to the center of your cardstock.
Step 3. Place the piece of scrap paper under your work. Using embossing powder, such as glitter, generously sprinkle the powder over the rubber stamp image. Carefully tap the cardstock to remove the excess powder. Make sure that the powder falls onto the scrap paper.
Step 4. Using the paint brush, remove any additional loose powder, but be careful not to touch the design.
Step 5. Heat the embossment with the heat gun/blow dryer until the embossing powder begins to melt. Let the embossment cool for a few minutes and then adhere the cardstock to your layout with two-sided tape.
Step 6. Pour the leftover embossing powder back into its container. The crease in your scrap paper should make it simple to pour the powder back in.
Scrapbook Embossing with adhesive foam. Super easy and fun!
Adhesive foam is a simple, yet effective, way to create paper embossing. Make a die-cut out of cardstock, scrapbook stickers, or even a message sticker. Trace the die-cut onto a piece of adhesive foam. When you cut out the foam shape, cut on the inside of your tracing. Adhere the foam to your die-cut and then attach it to your layout.
Here are some cute scrapbook ideas. If you've embellishing a page with flowers and grass, add a few insects such as ladybugs and bumble bees. Use adhesive foam for the insects. This will create a fun dimensional look to the page.

Embossing with stencils. Raised lettering.
Another form of scrapbook embossing is done with stencils. To create an interesting title for your layout, use raised lettering.
Materials needed:
♥ scrapbook or copier paper
♥ stencil
♥ removable tape
♥ stylus
♥ light source
Steps in creating raised letters:
Step 1. Using removable tape, tape the stencil onto your paper. Brass embossing stencils work best, but plastic ones work fairly well also. Place the paper, stencil side down, onto a light source. If you have a light box or a glass table that shines light upwards, great! If not, place your paper against a window that has direct sunlight.
Step 2. Press down on the paper with the stylus. You should notice a dent in the stencil area. Trace the stencil area a few times. When you remove the stencil from the paper, you'll have a raised image.
Step 3. Repeat steps 1 and 2 until your word or phrase is completed.
In addition to raised letters, you can use stencils with shapes for scrapbook embossing. For example, if you're designing a layout for a wedding. Add raised flowers to the corners of your layout.
Whether you choose heat embossing or dry embossing, adding scrapbook embossing to your layout gives your page an added visual interest. Chances are that you have most of the scrapbooking supplies on hand. You'll discover that embossing is relatively easy to do and fun. Give it a try today!
If you're stumped and not sure who to lean on for inspiration in your scrap craft, you can check out our article about the best scrapbooking blogs or, learn more with Scrapbooking Coach!

OUR BEST SELLING BOOKS


HERE'S SOME OTHER SCRAPBOOKING ARTICLES THAT YOU MAY FIND HELPFUL
The Top 5 Scrapbooking Tools That Are Proven To Help You Create Better Layouts
12×12 Scrapbook Layouts Tips You Should Never Miss!
5 Tips To Creating Catchy Scrapbook Titles For Your Layouts
TOP 5 Scrapbooking Ideas I LOVE!
How to Scrapbook: The Ultimate 'Learning How to Scrapbook for Beginners'
Scrapbooking Tips: 10 Tips To Help You Create Even More Enchanting Pages!
5 Simple Scrapbook Organization Ideas and Tips!
Scrapbook Stores Online: Shop from the Top 7 Best Craft Stores
Contact Us | Login | Store | About | Reviews | Privacy Policy | Terms & Conditions | Returns
Copyright © 2025 by ScrapbookingCoach.com
We accept payment with:
